Valentine’s Butter Cookie Cutouts

Valentine Butter Cookie CutoutsI’m not a huge fan of sugar cookie cutouts, however, these butter cookie cutouts drizzled with white and dark chocolate are buttery melty (I’m sorry spellcheck, melty is a word. My google sources say so. Be gone with your red squiggly underline.) goodness. I really wish I had made more already. I actually modified an old Russian Butter Cookie Recipe I found in one of my grandmother’s old cookbooks. These are pretty simple to throw together and the dough was wonderful to work with. Make some. Your valentine will love you for it.

You will need:

1 C. unsalted butter softened

1 C. powdered sugar

1 tsp. baking soda

1/2 tsp. salt

1 tsp. vanilla

2-1/4 C. flour

4-6 Tbsp. milk

8-12 drops red food coloring

heart shaped cookie cutter

dark (or semi-sweet) and white chocolate chips (I used semi-sweet and Godiva white chocolate chips.)

ziplock sandwich bags or gallon/freezer bags

This recipe makes approximately 2 dozen cookies. Bake 375 degrees for 6 minutes.

The dough:

In a mixing bowl, cream butter and powdered sugar. Add in baking soda, salt, and flour and cut into butter and powdered sugar.This should look a little crumbly, similar to a pie dough. Add your vanilla and 4 Tbsp. of milk and mix well. I used my hands and kneaded this just like a pie dough. If this feels too dry, add more milk a tablespoon at a time. Add in your food coloring and knead until color is even throughout the dough.

The cookies:

Lightly spread some flour out on your rolling surface and roll dough to 1/4 inch thick and cut out hearts with your heart shaped cookie cutter. Place these an inch or so apart on your cookie sheet and bake at 375 degrees for 6 minutes. 6 minutes. Do not bake them any longer. They will be soft. They may not look done. Trust me, these will get dry and crumbly if over-baked. Unless you know for a fact that your oven is always off the mark, take them out, take them out, take them out. 😛 Let them cool a few minutes before you take them off the pan.

The chocolate:

Melt a 1/2 C. of white chocolate chips in the microwave for 1-1/2 minutes and stir until smooth. Spoon this into a ziplock bag and cut a tiny sliver off the corner of the bag. Squeeze this over half of each cookie in a back and forth motion. Repeat with the dark chocolate chips. Allow your chocolate to harden and enjoy! valiced

My valentine is getting the plain sugar iced heart shaped cookie. He says he doesn’t like my ‘fancy-schmancy’ stuff. Oh well, no chocolate for you I guess!

Happy Valentine’s Day!
Peanut Butter Pie (OTW)

peanutbutterpie

Ok, so I have been told this pie is better than sex. Every time I served it, we would watch our customers take the first bite. They would chew for a moment, and then they all made the same exact eyes-rolling-into-the-back-of-the-head expression. You’ve got to make this pie. Just be forewarned that you will be asked to make this for every family gathering, pot luck, etc.

I actually found something very similar to this at the Hickory Grill in Hermitage, Pa. It was awesome, and it was made with a nut crust which totally took it to the next level. I’m definitely planning on working on that!

You will need:

Your own or a store bought deep dish shell baked per instructions.(Don’t forget to poke it.)

3/4 C. semi-sweet chocolate chips

1/2 C. unsalted butter

2 C. powdered sugar

8 oz. cream cheese

1/2 C. peanut butter

8 oz. cool whip

1/2 C. chopped peanuts

For the bottom:

Melt chocolate chips in the microwave 1 to 1-1/2 minutes. Stir until smooth.

Combine butter and 1 C. powdered sugar in a mixing bowl and cream well with electric mixer. Add in melted chocolate and blend until smooth. Reserve 1/4 – 1/2 C. of chocolate mixture to the side (I just take a couple of nice size spoonfuls.) and spread remaining chocolate evenly in the bottom of the prepared crust. Sprinkle half of the chopped nuts on top of chocolate in crust. Refrigerate this while we mix up the filling.

For the filling:

Combine cream cheese and peanut butter in a mixing bowl and cream together. Add in powdered sugar and beat until blended. On a slower speed, add in the whipped topping. Fill the remainder of your pie with this filling and refrigerate.

Finish:

Once your peanut butter filling has set, spread the remainder of the chocolate evenly over the top to within a half inch of the crust leaving some peanut butter showing around the edge. Sprinkle the remaining chopped peanuts over the top and refrigerate until your chocolate sets.

You will probably eat more than one piece at a time. You will probably choose this over sex more often than not so it may not be good for your current relationship. Happy noshing!

BethAnne

Cinnamon Rolls with Cream Cheese Icing (OTW)

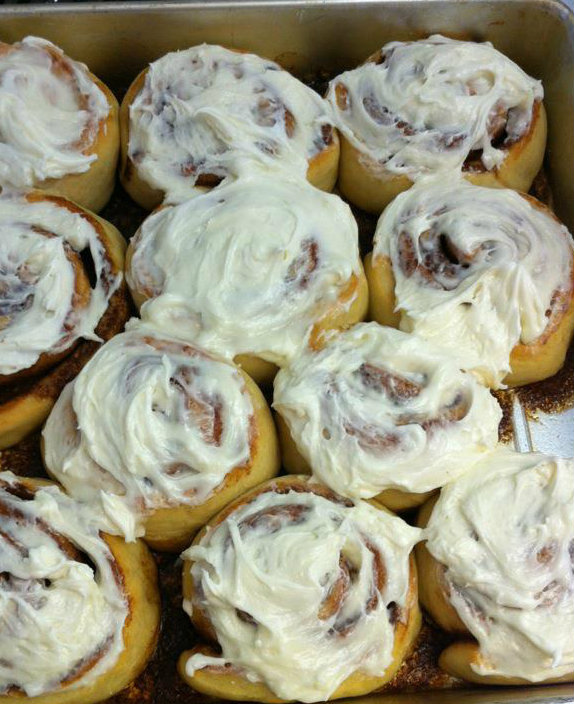
otwcinrolls

These are the ooiest gooiest melt in your mouth cinnamon rolls I have ever tried, and were an Off The Wall Cafe favorite.  I do believe this was originally a Cinnamonster copycat recipe but I can’t remember where I got it.  If you come across it, let me know so I can give proper credit.

For the dough:

2 eggs

1 C. milk

1/3 C. margarine or butter softened (I only use butter.)

1 tsp. salt

3 1/2 C. flour

1 pkg. (2 1/4 tsp.)  active dry yeast

Heat your milk to roughly 115 degrees, add yeast and stir in lightly. We’ll let this set and activate while we mix the dry ingredients. Add flour, salt, and butter to your mixing bowl and using a pastry blender or a fork blend butter into flour until it resembles pea size pieces. Beat your eggs in a separate bowl and add to the yeast and stir in lightly. Add yeast and eggs to the flour and stir until it stiffens up. Knead until the dough is smooth and just slightly sticky. Add more flour if it feels too sticky. Cover dough and allow to rise in a warm place for 1 hour.

For the filling:

1 C. brown sugar

1 T. cinnamon

1/3 C. butter  softened

While the dough rises, we’ll mix up the filling. Combine brown sugar and cinnamon well. Add the butter and cut in with a fork.

When your dough is ready, punch it down and roll into a rectangle 1/4 in. thick.  Cover the dough with your cinnamon mixture spreading evenly. Starting on one end, roll your dough up.  (I make these big so I roll them up from the short side.) Slice the dough into 1 – 1 1/2 in. pieces (depending on how big you like them) and lay flat in a greased 9 x 13 pan. Bake at 375 degrees for 12 minutes.

For the icing:

4 T. butter

3 oz. cream cheese softened

1  1/2 C. powdered sugar

While your rolls bake we’ll mix up the icing.  Using an electric mixer, cream together butter and cream cheese until smooth. Add in powdered sugar and beat until smooth.  Don’t eat it all before your rolls come out of the oven. As soon as the rolls are done, place a generous spoon of icing on each roll and smooth out gently. Once cooled enough, you should hide at least two from your husband.

Bon Appetit!

Homemade Pita Bread – originally from Brown Eyed Baker

To kick off the recipe section, I have a share for you. It is, in my opinion, the BEST bread ever! Making your own bread too daunting a task? It won’t be after this. This bread takes only a few minutes to throw together and is so versatile. We use it all the time. I  came across this recipe for Pita Bread on the Good Eats ‘n Sweet Treats blog almost a year ago and gave it a try. I promise you’ll love this recipe as much as I do!

Homemade Pita Bread-originally from Brown Eyed Baker

Pita Bread
Pita Bread

3 Cups flour

1- 1/2 tsp. salt

1 tbsp. sugar or honey

1 packet yeast ( 2-1/4 tsp.)

1-1/4 to 1-1/2 Cups water at room temperature

2 tbsp. olive oil, vegetable oil, butter, or shortening

Mix the yeast in with the flour,  salt, and sugar. Add olive oil and water. Stir together until all ingredients form a ball. If dough feels too sticky add a bit more flour, and if it’s too dry, add a bit more water.

Once the dough forms a ball, turn it out on a work surface and knead for 10 minutes. (I knead it right in the bowl.)  Or use your dough hook on your mixer for 10 minutes.

Form into a ball and coat a bowl and the dough with oil to keep it from sticking. Cover with saran wrap or a damp kitchen towel and set in a warm place to raise for 90 minutes. (I’ve waited 60 and been fine.)

Punch down and divide into 8 equal pieces, cover and let rest for 20 minutes. Preheat your oven to 450 degrees and put your baking stone in the oven to preheat with it if you have one. (I use a baking sheet and it works just fine.) Turn a baking sheet upside down and lightly oil it.

Place some flour on a work surface and roll or press out your dough into 1/4 to 1/8 inch rounds. If the dough will not stretch, let rest an additional few minutes. When all your dough is rolled, cover and let raise an additional 30 to 45 minutes. (I also don’t do this.)

Place as many rounds on your stone or cookie sheet as you can get at a time and bake for 3 minutes. This will leave them soft and pliable. If you like them crispier bake an additional 3-5 minutes.

So, that’s the basic recipe. It’s really pretty simple and can be whipped together in a few minutes once you’ve done it once or twice. I don’t do any raising beyond the initial 60 to 90 minutes and they still turn out great. I do, however, roll the dough out and let it rest for 15 minutes. If I don’t, it bounces back and I end up stomping from the kitchen like a twelve year old. It takes patience.

I’ve also divided the dough into 4 pieces and made it twice as thick which gives you a delicious syrian bread.

We make personal pizzas with this bread, stuff it like a burrito, tear it up and dip it in garlic sauce and hummus, and tear it in half and stuff the pocket with all kinds of good stuff. Your imagination is the only limit.

Last night's buffalo chicken pizza.
Last night’s buffalo chicken pizza.

Last night we used this bread to make buffalo chicken pizza. I divide the dough into 6 portions and bake the bread for 6 minutes (we like it crispy). Then top with a mixture of ranch dressing and Red Hot mixed to your liking. Add boneless chicken breast (ours is grilled with cajun seasoning). Top with cheese (we use a pizza blend or cheddar). And bake for an additional 5 minutes at 450 degrees until your cheese is hot and bubbly or until you just can’t wait anymore. Either way. Don’t be afraid to adjust this to your liking and try new stuff with it. The worst that will happen is you’ll know not to make that again. 🙂 Enjoy! I’d love to hear how your bread turns out and all the awesome ideas you come up with!